


I have been sewing a lot for myself lately, and I’m basking in it. I love summer, and I need clothes that I love wearing in summer! Sun dresses, shorts, tank tops, light and airy blouses, swimsuits, you name it, I need it. My warm weather wardrobe needs an overhaul, badly. Well, this summer dress is about as perfect as it gets for me. It’s the Jessica Dress from Mimi G, and it’s her free gift for subscribing to her newsletter (link is in her post – *see updates at the bottom). I love the simple fitted bodice, princess seams, tea length skirt, and big pockets. I love that this pattern will look great in a variety of fabric, so when I saw it I seriously dropped everything to begin fitting it. That was like two months ago now!!!
The first main change I had to make was to the bust size. My bust is small, so even though this pattern has princess seams that should allow me to take out the excess fabric, it didn’t look good when I did it that way. I learned awhile back that what works very well for me is to pinch out the excess fabric horizontally, removing some height. Here’s a really rough muslin version of what I’m talking about. Nothing like late night fitting 🙂
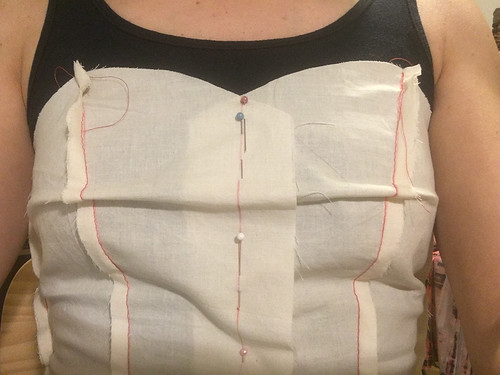
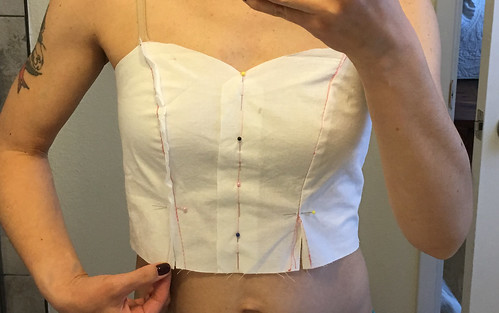
After that, I can remove fabric using the princess seams, but for this dress pattern, removing it from the height was all I needed to do. Here is my muslin sewn with the bust alteration. I like to sew one side with seams out in case I need to tweak more, and one side with seams in to make sure it’s going to finish the way I want it to. It’s really not that much more work, and it saves me from being disappointed when I get to my final fabric. I also needed to let out the waist, and I pinched out a little at the upper back seams after sewing my bodice together. For the skirts I shortened them 4″ since I’m 5’3″.
I had purchased this lovely black on grey floral print chambray from Cali Fabrics during their chambray week sale, and I knew I wanted to make this dress with it. This fabric is light to mid weight and doesn’t require a lining at all (mainly important for the skirt since I’m lining the bodice). I love the gray color with cute little black detail, and I can wear just about any sandal or boot color with it too. Chambray is also one of the easiest fabrics to sew with which just makes everything easier!
I don’t like messing around with bra straps, so I used molded cups for this dress. Here is what they look like when sewn to the wrong side of the lining (I get my molded cups from Wawak by the way). What I do is try the lining on and pin it at the closure. I then adjust the cups where I want them to go and secure with pins or wonder tape, then zigzag stitch around them.
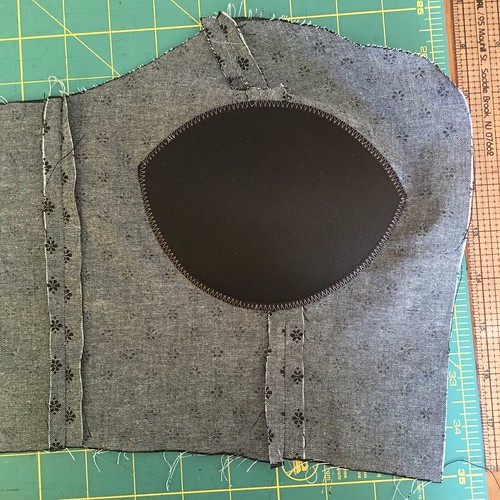
Here it is from the right side of the lining. Pretty much invisible.

Then I continued to sew the lining just like any other lined bodice. I hand stitched the bodice lining down to the skirt so I could enclose the waist seam and have a beautiful outside without any visible topstitching.

I sat on this dress for weeks, trying to figure out whether to use buttons or pearl snaps. It ended up that I really didn’t have a choice because the horizontal button holes would’ve been impossible with those molds sewn into the bodice lining, so snaps it was! I made sure to interface my bodice where the snaps would be placed before sewing too.
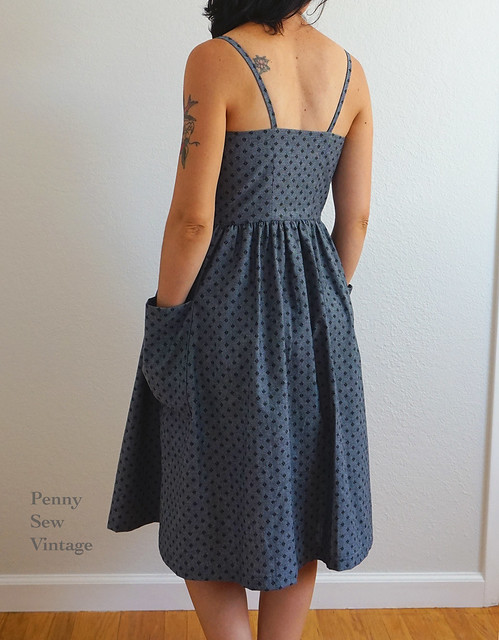
Then I sat on it awhile longer, deciding on whether I wanted to add pockets or not. Finally, I decided to add them. I guess what was making me hesitate was playing around with the pocket size because they’re one size for all. In the end I did need to make them smaller because they gaped considerably. I used the pattern’s top fold line, but the sides and bottom I used a 1 3/8″ seam allowance instead of the 3/8″ (next time I’ll just cut off the extra fabric). Then I placed them 5″ below the waist seam and centered them on the side seam line.
Another extra I added was stay tape to the top of the bodice to help hold its shape. It was a sew-in stay tape that I merely placed at the top while sewing the top seam. Here’s an introductory post about stay tape on Gertie’s Blog for Better Sewing, and another stay tape post about ways to use it. Notions are so fun don’t you think? I’m not sure I needed it, but whatever, it was fun trying it out.

Anyway, I’m LOVING this dress and hope to get a chance to make a second one this summer. It’s not a difficult dress at all, but with the added lining and molded cups, and hemming and hawing it took just a bit longer. The instructions are very clear, and I really enjoyed the whole process of making it. Gah I love summer dresses!!!
Have you made yourself any summer dresses yet? Any you have on your list?
*5/15/21 – Here’s the current link to her dress pattern
9/14/2023 – The Jessica Dress is also a class on Creative Bug where you will get the pattern and learn some sewing hacks for the finished dress (a peplum and skirt). I stumbled upon it awhile back but haven’t watched it yet.


What an amazing job fitting and making this gorgeous dress! It looks lovely on you! Enjoy all summer long! ❤
LikeLiked by 1 person
Those bust fitting tips are really helpful. And I’ve been considering adding cups to my camisole style garments. I really appreciate hearing from someone who has used them successfully, and the how-to on getting them placed right.
LikeLike
Glad I could help! I’ve used this technique and cups in other tops/dresses and been very happy with them 🙂
LikeLiked by 1 person